

The answer is “Yes!”
A well-meaning mom with no experience can build a basketball area in the backyard for her kids using paver stones.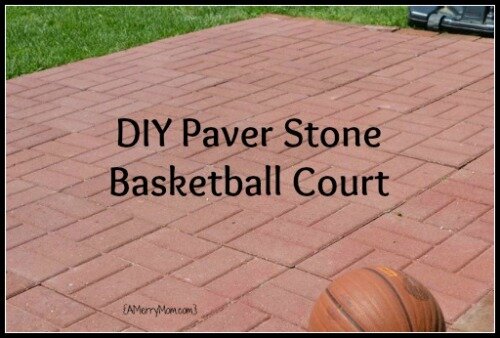
As the mom of two boys, I spend a lot of time on sports-related things. I really never thought I’d build a small basketball court in the backyard for them, but a mom’s gotta do what a mom’s gotta do!
When we moved to our house, it had a lot going for it. What it didn’t have was a place for my boys to play basketball. And they love to shoot basketball.
Since our driveway slopes down to the street in the front, the backyard was the only option for a basketball goal. Some friends from church gave us an almost-new goal after their daughter left for college. The kids were happy to have it, but it’s hard to dribble on grass!
We debated a solution for a while. Pouring a concrete basketball court would be a big investment. My husband was busy at work and didn’t have time to take on a DIY project.
Finally I decided I could build a basketball area myself by laying paver stones that would connect to the existing covered patio. My hubby thought I was crazy for volunteering for that job, but I finally I convinced him I should give it a try.
After he agreed, I started clearing the sod from the area. I recruited the kids to help some. It was a good arm workout for all of us! I thought that would come in handy for lifting the 16-inch square paver stones and setting them into place.
Little did I know how much more arm strength I really needed! My trip to Home Depot to buy the materials made me realize that I needed a new deal with my hubby: if he would buy all of the paver stones and sand for the underlayment and transport them to the backyard, I would do the rest.
He was sure I would be asking for more help and he would be spending all of his time off work laying pavers for me, but I was determined to get that part of the project done all by myself. Somehow I made it happen!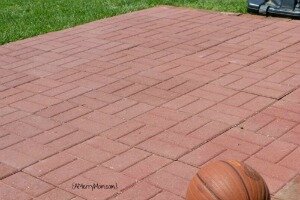 I’m not gonna lie. It was hard work, and it took me a long time to get it done. The project did not follow the fast pace of some of the done-in-a-weekend tutorials I had read. (If you need a full how-to tutorial for installing paver stones, I liked the ones at The Handmade Home, Better Homes and Gardens, and Lowes. Yep, I read a bunch of tutorials before I got started.)
To complete my project, I worked on it a little at a time for weeks. I worked carefully to make sure the base sand under the pavers was really smooth so the pavers would lay flat.
Besides the physical weight of the pavers, my biggest challenge was getting the sand layer smoothed out just right so the court was totally flat. I definitely didn’t want anyone tripping over the stones!
I finally finished laying the stones and sweeping sand between them before the cold weather arrived last fall. When I got that last paver done, I was a very merry mom!
The last stone was hard to install with stones on two sides and the edge forms on the other two sides. I had to kinda drop it in, which messed up the sand layer on my first few attempts. I had to re-level the sand and try again until finally I got it in right. Whew! Getting everything level was a lot harder for me than it sounded before I started on this little endeavor.
I did a happy dance that it was all done! Then I couldn’t wait to usher my kids outside to try it out when they got home from school that day. They were thrilled to squeeze in some basketball time in the backyard when it wasn’t too cold.
As much as I wanted to show off my little basketball court, I didn’t post anything about it here last fall. Since my work was not a by-the-book installation, I wasn’t sure it would hold up. I thought the cold weather might make the stones heave up out of place over the winter.
Now that spring has arrived after our especially cold, harsh winter, I’m happy to report that the basketball area made it through the last five months intact! My boys have been playing basketball on it all spring.
Today I’m finally declaring success building a DIY backyard basketball court from paver stones. And if I can do it, anyone can! 
2016 update – A few people have asked if the pavers are holding up well over time since I originally installed them. The answer is yes! After going through a few winters with freezing and thawing, the pavers are still looking good. We have to do some weed control between the pavers from time to time, but this basketball court has been maintenance free otherwise. We did have to buy a new basketball goal, because our original, free goal rusted. We bought the Lifetime 1221 pro-height adjustable basketball system from Amazon (affiliate link) and have been very happy with it. It came with free home delivery, which was handy. The setup took some time, but it’s a nice goal.
Space planning details for our DIY backyard basketball court
Due to the space constraints in our yard, I loosely based our basketball area on a free throw lane. It’s 16 feet long and 8 feet wide.
My reasoning was that the NCAA free throw line is 15 feet from the backboard, so making our court 16 feet long gave us a foot of space for standing to shoot free throws. That worked out to exactly 12 of the 16″ paver stones for the length of the basketball court. I added a border of single bricks around the paver stones to make the final size correspond to our existing covered patio space – and to gain a little more room for standing to shoot free throws.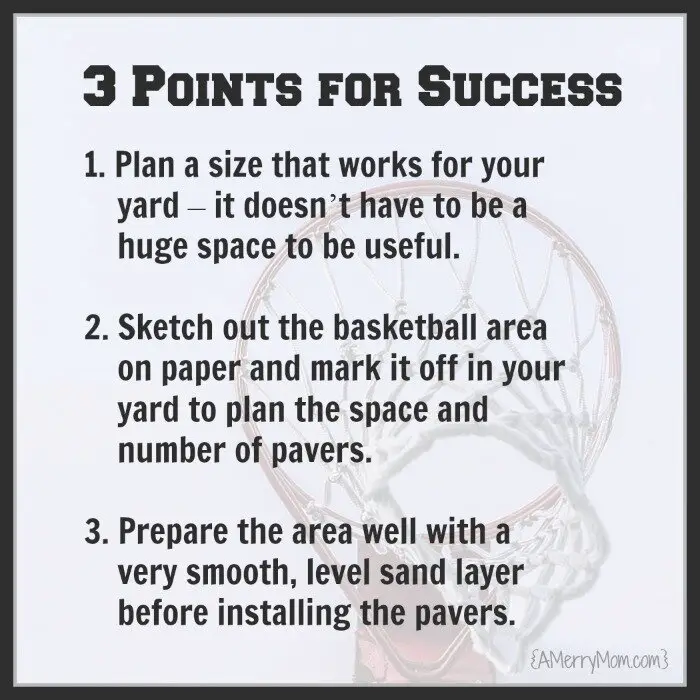
Although the regulation free throw lane is 12 feet wide, our court is just 8 feet wide.
For us, the size decisions were based on space and budget. With this size, my kids can practice free throws, layups, and inside shots.
Our basketball court definitely would be better if it was large enough to give my kids room to practice 3-point shots, but I keep reminding them (and myself) that it’s better than nothing!
You could really make a court any size that works for your yard. I measured and sketched our backyard basketball court on paper with a couple of size options, then marked it off in the yard before getting started.
Using 16″ square paver stones, I needed 72 pavers for our court (6 rows of 12). I used 16-inch square paver stones with a brick basketweave pattern stamped onto them.
Before buying the basketweave-patterned paver stones, I checked to make sure the basketball would bounce OK on it – and it does. The brick lines in the pavers don’t seem to affect the bounce of the basketball at all.
Are you planning a paver stone basketball court in your own yard? I’d love to hear about your DIY project!
This DIY basketball court project is linked up at some of these link parties.
This post contains affiliate links, which help support this site. If you make a purchase after clicking an affiliate link, I may receive a small commission that helps me keep this site running.
Please refer to my disclosure statement for more information.
What a great idea! I’m sure it will get used and not just for basketball! Thanks for sharing on Whatever Wednesday! See you again next week!
Thanks. I do like having the extra patio space! It looks so inviting for potted plants, but they’re not safe there while the basketballs are flying! Thanks for hosting the linkup!
Hi Lisa! We are considering building a backyard paver basketball court. I’m convinced it’s a perfect solution – but like many of the the replies I’ve read – my husband is a non-believer!! So after 2 years, how is your court holding up? I’m concerned about the tiles moving and unwanted growy things in the cracks. If we proceed with this project, my husband will end up totally committing to it – like renting equipment to really tamp and level the paver base. I think it could ultimately be as good as concrete. I’d love to know how yours is surviving weather and wear. Thanks!!
Hi, Torrey! Our basketball court is holding up well. The pavers haven’t shifted at all – it’s still nice and smooth. Weeds do want to grow in some of the cracks between pavers, so we have to spray (or pull them) occasionally to get rid of them. Other than that, it has been maintenance free!
Hello Lisa, thank you so much for sharing. I live in a subdivision that does not allow concrete courts. I was so desperate to find a way to create a court for my son’s to shoot basketball. Just like your driveway, mine also has an upward slope which would make the basketball roll downward into the street. I heard about the idea of stones and sand and pitched it to my husband and my dad. Well needless to say they were both in doubt. So I am setting out to prove them wrong. I don’t think my husband really wants the responsibility of that project. But I have a vision for my children and I won’t stop until I fulfill it. I want to create a park setting for my family in the backyard. We already built a nice wooden swingset with monkey bars. It was hard work but I am proud of the DIY project my dad helped me create. Nonetheless, anymore info you can give me about everything I will need to create the court out of paver stones, I will greatly appreciate it. Thank you so much for sharing your success and your merry heart.
Thanks for stopping by, Sherrika. I’ve been working on that park-like backyard, too. Sounds like you’re on your way with the swingset you built. It really is rewarding to see these types of DIY projects come together! For the paver basketball court, the step-by-step tutorials that I linked up above were really helpful on the specific steps to follow to prepare the area and then install the stones. My biggest challenges were getting the sand layer perfectly level and handling the physical weight of the materials. I could not have completed this project if my hubby hadn’t supplied the muscle to get the bags of sand and the stones to the back yard. So it would definitely help to get your husband and/or dad on board if you build your own paver basketball court! I would love to hear back from you if you do it. Best wishes as you make your backyard a special place for your kids!
Your kids are going to have so much fun on the diy basketball court (and so will all the neighborhood kids Thanks for sharing at Inspire Us Thursday on Organized 31.
I have to admit, I’m having fun going out and playing basketball with them, too! Thanks for stopping by, Susan!
We’ve done pavers before and I kind of chuckled when you mentioned the new deal with your hubby…those suckers are heavy! You did an awesome job by yourself. Do you have any tips for others venturing to do this type of project?
Thanks Erlene! You’re right – those stones are heavy! That project was a good weight-training workout. I’ve been thinking about a follow-up post with some lessons learned. I’ll have to link it up at your Merry Monday linky party!
Wow! You are such a sweet mom to do that for your kiddos! I might have to see if we could do something similar in our backyard. Our driveway slopes to the road too. 😉 Thanks for sharing at my Creative Ways Link Party!
Blessings,
Nici
Thanks, Nici. It was worth the work to see them out there enjoying it! Thanks for hosting the link party. I’ll be back!
I am totally wrestling with doing a paver court. Can you tell me a little more about it?
Any stumbling on paver seams?
Does the ball bounce okay on it?
Did you use smoooth or textured paver?
How big is the court?
What would you do different?
Thanks!!
Scott, I used 16″ square brick-patterned pavers. The ball bounces well on it despite the fact that it’s not a smooth surface. (Our small grill area has the same type of pavers so I checked how well the ball would dribble before using that type.) I worked really hard on the leveling process to make sure all the pavers are flat so the seams wouldn’t be an issue. A good layer of sand underneath was the key for that part. You can’t detect the seams at all when you walk or run over it.
Since I was doing this myself and wanted to make the project manageable, I just made our court a little bigger than a free throw lane so my boys could practice free throws & layups. We all wish it was larger, though, so that’s the main thing I would do differently. They want it to be big enough for practicing 3-point shots without standing in the grass! I may end up expanding it. We also learned that these types of paver stones can sell out quickly. My husband was buying them about 10-12 at a time as I needed them since I was working on it slowly and didn’t need them all at once. But a few times he went to get more and they didn’t have any in stock, so that slowed down progress while we waited and checked in for a new shipment.
Good luck if you decide to put in your own paver court! It was a lot of work, but totally worth it!
How many inches of sand did you use underneath the pavers? I am doing the same project for my boys in my backyard, I was super stoked when I was able to get the bricks at Lowe’s on sale for half price, it was worth it to do a one time delivery for all 300 pavers. I am planning on doing a 17′ x 17′ court.
Dana, how awesome that you scored a great deal on the pavers! I used a minimum of 1 inch of sand under the pavers. Due to placement in our yard, it was more like 1.5 – 2 inches in some areas as I leveled out the pavers and graded the area to keep water away from the house. Good luck with your project! I’d love to see pics when it’s done.
Thanks for this post! My kids are gonna be so excited once I finish this up!
Thanks so much for your informative post! My 16 year old son desperately wants a place at home to practice basketball. We live in the country, & there is no pavement to bounce a ball. The pavers seem like the most economical solution. I know he would want it large enough to practice 3 point shots, so I’m thinking 108 of the 16 in pavers (9 rows of 12), which would make it 16 ft long by 12 ft wide – if my calculations are correct. Unfortunately I’m far from a mathematician, and even further from being a contractor. My husband is deceased, so I’m hoping my son (and maybe some friends) could work on the project together. I’m curious about how many lbs of sand you used underneath, and if you may be able to give me some insight on how much an area of the size I’m planning might require.
Michelle, I wish I could remember exactly how much sand we used for this project. We just bought it as needed since I was working on this in sections, a little at a time. It’s supposed to be at least one inch deep underneath the pavers. I used more sand in some areas to level it out. The Lowe’s tutorial I linked up has handy calculations for materials planning. Lowe’s says to use this formula: (area of project in square feet) ÷ 6 = cubic feet of paver sand for the base + filling in the joints between pavers. Hope that helps. I hope it all goes smoothly if you decide to put in a basketball court for your son!
Do you have any idea about how much this project cost?
Betsy, the 16×16 pavers were about $3.75 each, and I used 72 of them, so that part was about $270 + tax. The sand was about $4 per bag. I didn’t keep track of my sand very well since I did this project a little at a time, but I think I used around 7-10 bags of sand, so that was around $40 + tax. The edge forms were about $8.50 each, and I needed 6 for my space, so that was $51 + tax. The rest of the tools and materials I used were things we already had on hand. My total cost was about $361 + tax. I had originally budgeted $350, so I came in a little over budget. (Isn’t that how these projects always go?!)
I should note that paver tutorials say to dig down and add a gravel base under the sand. In my case, when I started clearing the grass I found that the ground already had a lot of rock in that area (I think previous owners may have had something there years ago). Therefore, I did not dig down farther than needed for the sand base, and I did not add more rock. If I had, the rock would have increased my cost. Be sure to account for that cost if you plan your own project!
It’s been a while since this post! How is it holding up? We are planning to put a court in our backyard and this route is so much more cost effective than what we’ve been looking considering!
Courtney, it has held up well. I just have to do some weed control between the pavers once in a while; other than that, it’s been maintenance-free.
Sweet! Thank you. My honey and the kids are going to be so excited. And I love that it looks so much prettier than concrete. Thanks for the great idea!
How many pavers did you by in total?
I used 72 of the 16″ pavers for our court (6 rows of 12). I added a border of single bricks around the paver stones to make the final size correspond to our existing patio space – and to gain a little more room for standing to shoot free throws.
Hi Lisa,
Thank you for the inspiration. I’m going for it!
I have a large sand pit (where the previous owners removed grass because of the drought, & made a sandpit for kids). Do you think I need to remove some of the sand or can I just compact it all down? I’m sure there is about 4″ (or more), rather than the standard 2″ and there is no gravel underneath for more drainage.
Thanks.
Hi, Toni. I’m glad you found this post helpful. It sounds like a great way to use the sand pit area you have! As far as the sand already there, I’m not sure. If you’re in an area that doesn’t get a lot of rain, it may not be super important to have that gravel layer for drainage, and extra sand may be fine. But I’m not an expert so I don’t want to steer you wrong! A home improvement/landscaping forum may be able to help – diychatroom.com / contractortalk.com / gardenweb.com are some places that I have checked out. They have landscaping forums for Q&As. Good luck with your project! I’d love to see how it turns out.
I have a few questions if you have time
Sure! Feel free to post them here and I’m happy to reply.
I was just wondering how wide the gaps are? I’m thinking about doing something like this but with the Quikrete walkmaker mold. Also, did filling the gaps with sand make a difference with how the ball bounces?
The space between the paver stones is pretty small. I’d say about a quarter of a centimeter or less. The sand doesn’t affect the surface – I swept away the excess & wind blew away anything I missed, so the sand is even with the stones and doesn’t interfere with the basketball. Unfortunately even with the small space and sand between the pavers, weeds try to grow there in the sand. So there is some occasional weed maintenance needed.
Okay thank you so much. Is there any way to see a few more pictures of it now? Thanks for your reply. Hopefully mine turns out good with the mold I’m going to use
I’ll plan to add some new photos to the original post since I often get questions about how it has held up over the years. Good luck with your project!
Okay thank you so much.
So did you dig down into the ground to place the sand and then the pavers? If so, about far down did you dig and clear out? I saw this Pin and thinking of trying it for my son!
I did dig down a few inches. Since the soil was fairly rocky already, I didn’t do the whole rock layer that I read was supposed to be for drainage. I added the compacted sand layer over the rocky soil deep enough to make the height even with an existing covered patio area. My non-professional job has held up well over the years, but I definitely would recommend reading a full how-to guide before starting!