Tag Archives: dessert

Easy cannoli bites

One of my favorite parts of our summer vacation to the Northeast was eating some delicious cannoli from Mike’s Pastry in Boston’s North End.  It was recommended as one of the best bakeries in Boston for cannoli, and it did not disappoint!

There’s just something about the crispy shell with the creamy ricotta filling that makes cannoli so delectable!

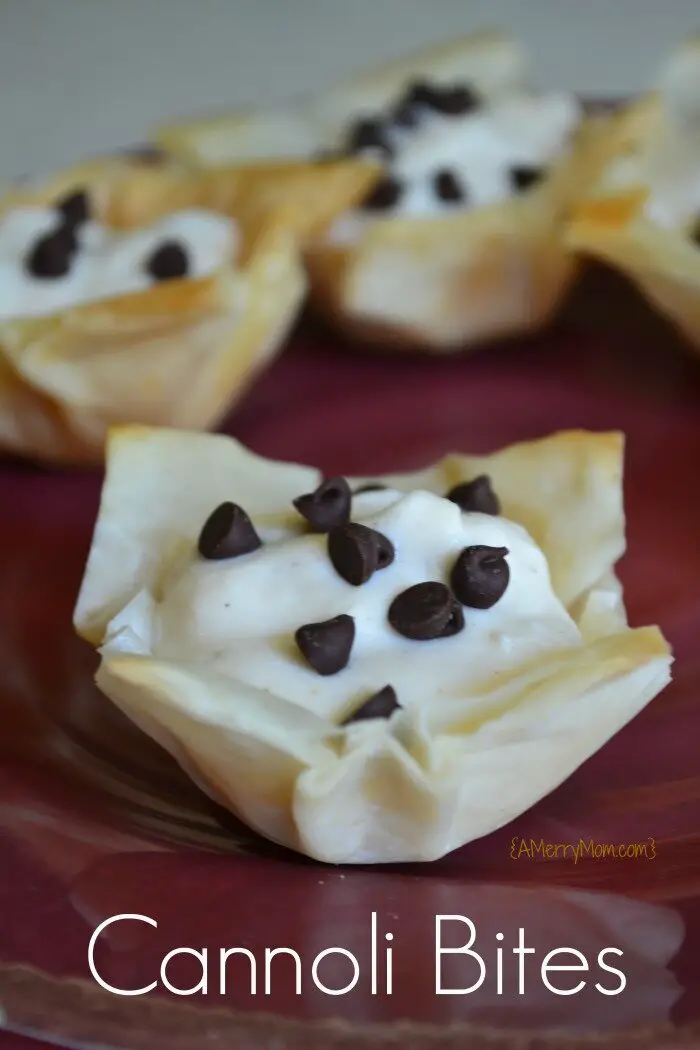
I decided I had to find a way to make cannoli at home so we can enjoy it more often.  But I really didn’t want to spend the time making and rolling the cannoli shells.  I wanted to make a simple cannoli variation – a yummy dessert without a lot of work.  These easy cannoli bites are perfect!

They are so simple to make and taste so good!

Cannoli bites - AMerryMom.com

How to make easy cannoli bites

The pastry for these easy cannoli bites is a phyllo dough shell rather than a traditional fried cannoli pastry.  I make the shells from frozen sheets of phyllo dough (click for the instructions).  You can also purchase pre-made frozen shells at the grocery.

I love phyllo dough because it bakes up light and flaky and the box doesn’t list any trans fat or partially hydrogenated ingredients.  The shells are a light, no-fuss base for the delicious cream filling.

Ingredients

24 phyllo dough shells  (thawed if using frozen shells)

1-1/3 cup low-fat ricotta cheese

4 ounces mascarpone cheese  (I buy an 8-oz. container and use half)

1/2 cup powdered sugar

1/4 teaspoon cinnamon

1/2 teaspoon vanilla

1/4 cup mini chocolate chips  (be sure to use the mini chips for these small dessert bites)

+extra mini chocolate chips for garnish

Instructions

In a medium bowl, combine the ricotta and mascarpone cheeses, powdered sugar, cinnamon, and vanilla.  Stir with a spoon until the mixture is smooth.  These ingredients combine together easily – no mixer is needed!  Stir in the chocolate chips.

Use a spoon to fill the shells with the ricotta mixture.  Handle the shells gently, as they can be a bit delicate.  Don’t overfill the shells, or you won’t have enough of the cream filling for all of them.  Sprinkle more mini chocolate chips on top as a garnish.Easy cannoli bites - AMerryMom.com

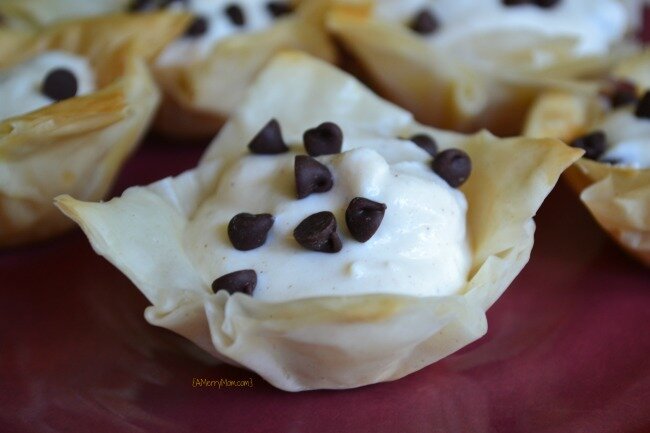
That’s it!  These easy cannoli bites are seriously so simple, and also incredibly yummy!

They’re my favorite type of dessert for entertaining.  They seem fancy but are a snap to make.  The bite-size portions make these desserts a perfect way to finish off a great meal.

Keep in mind that these are best when they’re fresh.  After they’ve been filled with the ricotta mixture, the shells will become soggy with the passing of time.  If you need to work ahead, you can prepare the shells and filling and keep them separate until you’re ready for these desserts.

The filled cannoli bites keep in the refrigerator overnight with some crispness left in the shell, but they’re pretty soft after two nights in the fridge.  So don’t fill the shells too much ahead.

Enjoy!  Mangia!

Easy cannoli bites
 
Ingredients
  • 24 phyllo dough shells (thawed if using frozen shells)
  • 1-1/3 cups low-fat ricotta cheese
  • 4 ounces mascarpone cheese
  • ½ cup powdered sugar
  • ¼ teaspoon cinnamon
  • ½ teaspoon vanilla
  • ¼ cup mini chocolate chips
  • +extra mini chips for garnish
Instructions
  1. In a medium bowl, combine the ricotta and mascarpone cheeses, powdered sugar, cinnamon, and vanilla. Stir with a spoon until the mixture is smooth.
  2. Stir in the chocolate chips.
  3. Use a spoon to fill the shells. (Don't overfill the shells or there won't be enough of the mixture for all of the shells.)
  4. Sprinkle extra mini chocolate chips over the cannoli bites as a garnish.


Adapted from EmilyBites.com.

This recipe is linked at some of these link parties.

tres leche cake amerrymom.com

Tres Leche Cake

It was love at first bite when I tasted tres leche cake last year.  Have you tried this cake?  It is so good!

It’s a sponge cake with a glaze of three types of milk (hence the name tres leche cake).  The glaze soaks in and makes the cake amazingly delicious.  Then it’s topped with a whipped cream frosting.  Yum!

Tres Leche Cake recipe AMerryMom.com

Since tres leche cake is from Latin America, it makes sense that I first tried it while I was away on a business trip in the southwest.  My immediate reaction was that I wanted to learn how to bake it for my family because they would love it too.  But I had my doubts about my ability to make it.  This cake was so good that I thought it was probably super complicated.

Fortunately, when I looked for a recipe, it appeared easier to make than I had imagined.  I landed on a recipe from the Food Network’s Alton Brown and decided to give it a try.

I’m so glad I can make this cake for my family now.  It quickly became my hubby’s favorite dessert.  He asked for it as his birthday cake this year.

I adapted the recipe from Alton Brown’s version since his measures the ingredients by weight (ounces), and I’m used to measuring by volume (cups).  Here’s the recipe I use.

Tres Leche Cake
Author: 
 
Ingredients
For cake
  • 1 cup cake flour
  • 1 teaspoon baking powder
  • ½ teaspoon kosher (coarse-grained) salt
  • 1 stick unsalted butter, softened to room temperature
  • 1 cup sugar
  • 5 whole eggs
  • 1.5 teaspoons vanilla extract
For glaze
  • 1 12-ounce can evaporated milk
  • 1 14-ounce can sweetened condensed milk
  • 1 cup half-and-half (or use whole milk)
For whipped cream topping
  • 1 cup heavy whipping cream
  • ¼ cup sugar
  • 1 teaspoon vanilla extract
Instructions
  1. Preheat the oven to 350 degrees F.
  2. Use a 13x9 pan and lightly oil and flour the bottom, then set aside.
  3. Combine the cake flour, baking powder, and salt in a medium bowl, then set aside.
  4. Use a mixer (hand mixer or stand mixer) to beat the butter on medium speed until fluffy.
  5. Add the sugar for the cake gradually, mixing on low speed.
  6. Add the eggs, mixing them in one at a time.
  7. Mix in the vanilla extract.
  8. Add the flour mixture in three batches, just until combined.
  9. Spread the batter evenly in the cake pan. (It will appear to be a small amount of batter.)
  10. Bake for 20-25 minutes on the middle rack of the oven. The cake should be lightly golden and should pass the toothpick test. (A toothpick inserted in the middle and pulled back out should not have batter on it when it's removed.)
  11. Let the cake cool in the pan for about 30 minutes, then poke small holes all over the top of the cake using a toothpick, skewer, or fork.
  12. While the cake is cooling, whisk together the ingredients for the glaze: evaporated milk, sweetened condensed milk, and half-and-half. (Whisk together in a large measuring cup or bowl with a pour spout so the glaze is easy to pour onto the cake.)
  13. When the cake has cooled, but is still warm, pour the glaze over the cake and let it soak in. It's best to pour it over in a few batches, letting the glaze absorb before adding more. Stop adding the glaze when the cake stops absorbing it. (About ½ cup of glaze may be left - discard leftover glaze.)
  14. Make the whipped topping by mixing the heavy cream, sugar, and vanilla extract together on low, then increasing to medium speed after it begins to form peaks. Continue mixing until thick. Spread the whipped topping on the cake after it has cooled completely.
  15. Serve after the cake has had several hours for the glaze to soak in. Use fresh fruit as a garnish on top if desired.
  16. Store the cake in the refrigerator.
Notes
This cake stays in the pan since it has a milk glaze that absorbs into the cake, and it must be stored in the refrigerator, so a cake pan with a lid is ideal.
When adding the glaze, the cake may seem soggy if all of the tres leches glaze mixture is used. Be sure to stop adding the glaze when the cake stops absorbing it. Don't force all of the glaze onto the cake.

Tres leche cake is a yummy dessert for any occasion.  It’s great with strawberries on top as a garnish.  Enjoy!

This tres leche cake recipe is linked up at some of these link parties.

The best, easiest buttercream frosting

Have you found your perfect buttercream frosting recipe?  I’ve tried a bunch and finally found the one.

Easy Buttercream Frosting Recipe

I’ve tried many buttercream frosting options and had a hard time finding one that was just right.  I wanted one that was fast and easy – and yummy, of course.

The various recipes I tried with powdered sugar always turned out overly sweet.  But I was determined not to use canned frosting due to the trans fat content.  So I kept trying different recipe variations hoping to find the perfect one.

While perusing recipes online, I saw Martha Stewart’s velvet cocoa cake with instant buttercream.  The instant buttercream part caught my eye.  That sounded promising.  When I checked the ingredients for the frosting, there was no powered sugar.  Instead it used marshmallow cream.  What a brilliant idea!

I still haven’t tried the cake recipe, and I typically use a slightly adapted version of the Martha Stewart buttercream recipe.  Hers is chocolate, but I prefer using this recipe in vanilla.  It’s super simple!

1 stick (1/2 cup) unsalted butter, room temperature

1 jar (7.5 ounces) marshmallow cream

1/2 tablespoon vanilla extract

Beat butter, marshmallow cream, and vanilla until fluffy.  Refrigerate about five minutes to thicken, if needed.

That’s it!  So easy.  This frosts a cake or 24 cupcakes, but if you like to use a lot of frosting, you may want to double it.

I love, love, love this instant buttercream.  My husband calls it the best frosting ever.  I hope you enjoy it, too!